


When I last left you with my Lowe's Creative Ideas Furniture Rehab Project (Part One is here), I hinted that there was something more than just putting a planter in a table. Even though just doing that takes the table from ordinary to interesting, just one more thing elevates it to functional.
Once the table was painted, I could drop the planter down into the hole that Romie cut for it. Since it will probably rain here someday (we're hoping, anyway), it needed to be sealed around the edge, where the planter and the table meet, to keep water from running down into the inside of the table. A thick ribbon of silicone sealant took care of that. (Sorry, but I forgot to take a photo of this step.)

I took the other one, popped out the hole in the bottom of it for drainage and planted a colorful Croton in it. I placed the planter down inside the one already in the table.
Nice, eh?

But let's just say we're having guests over for a swim. (This table is on the deck area by our pool.) Used like a coffee table, magazines and drink glasses always end up on it. We've often brought out a cooler with ice for keeping drinks cool, whether it's a bottle of wine or cans of pop.
But now...
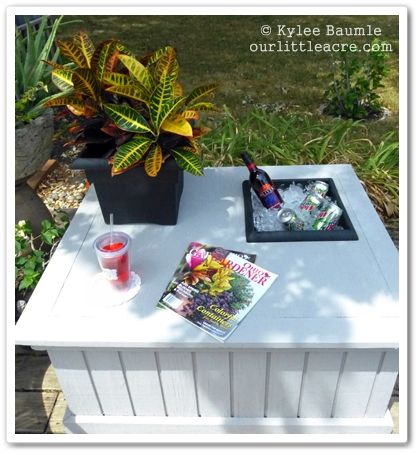
...the table can serve as a drink cooler, too!

Just lift out the planted container and sit it on the table and fill the original planter with ice! I popped out the hole in the bottom of that one too, so that the melting ice could drain into a small bucket under it.
The top of this table is hinged so that the inside can be used for storage, so it's easy to empty the bucket. And because we try not to be wasteful, the water that drains into the bucket can then be used to water the planter!

~~~~~~~~~~~~~~~~~~~~~~~~~~~

For other Lowe's Creative Ideas for your home and garden, check out their web page!
As part of the Lowe's Creative Ideas Garden Club, I was provided with a Lowe's Gift Card to cover the cost of materials for my project.


 "Bejeweled"


4 comments:
Very neat design Kylee!
For outside use (such as you demonstrated), you could also put a fitting for a vinyl hose in the bottom of the lower container, then run a drain hose through the bottom of the table. Obviously, you wouldn't be able to recycle the water, but you wouldn't have to manually drain it, either.
Dave ~ Thanks! It was a challenge getting this one completed. My surgery was moved up unexpectedly by two weeks (they called the day before!) and then about the time I was ready to paint and finish it, the storm hit!
Jim ~ We actually thought about doing that, but didn't want to drill another hole in the table. We'll see how this works out over time. If it's too much of an issue, we may do just what you suggested!
Or even easier . . . use a piece of rigid PVC, perhaps 1" or 1-1/4", inserted into the bottom of the table. Cut it so the top is perhaps 1/4"-1/2" below the bottom of the container. Put a hole in the container where the pipe is so it drains directly into the pipe, and out the bottom. That will allow you to open and close the top without worrying about having a drain tube.
Post a Comment