


Last year about this time, we drove past a nearby home and I noticed several silver buckets hanging from one of their large trees in their front yard. I recognized that they were collecting sap from their maple trees, most likely to make maple syrup. "That looks like an interesting thing to try," I thought to myself, but I knew it was getting late in the season to start collecting sap of my own, so I filed the activity away for something to do the next year.

I was pretty excited to find this, and owner Joe McHale talked to me at length about how simple the process is. He was giving away free spiles, so I took one, intending to head home and get whatever else I needed at a little later time to collect sap from the maple trees on our property. But before I could go, Joe generously gifted me with a Starter Kit to take home with me. I was beside myself.
Well, now it's March and time to tap the trees! Today was the day, although we could have done it a few weeks ago, just to make sure we got all the sap possible from our trees. The ideal time to tap them is when the daytime temperatures are above freezing and the night temperatures are below freezing. This creates a fluctuation of suction and pressure within the trees that causes the sap to flow. A detailed explanation (it's pretty cool!) can be found on Cornell University's website.
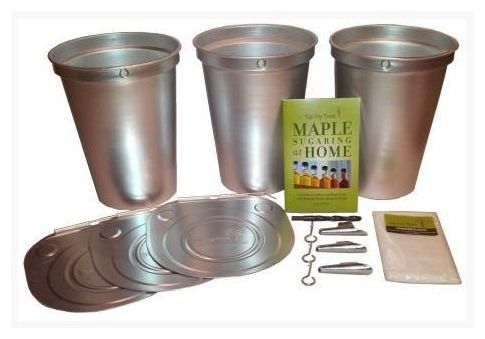 |
| Photo and Starter Kit from TapMyTrees.com |
I got the Starter Kit out, which contained all I needed to get started:
- 3 spiles (these are what you put into the tree for the sap to flow out of)
- 3 hooks
- 3 aluminum buckets
- 3 lids
- a 7/16" drill bit with a 3/8" shank
- cheesecloth (for straining the sap later, when you make the syrup)
- a book that tells you how to do everything, including making the syrup
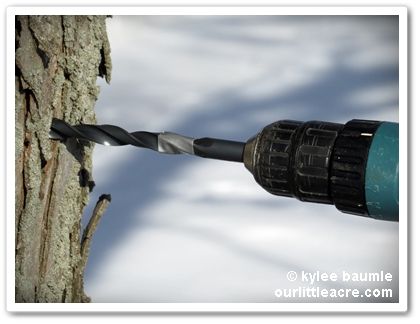 |
| The piece of duct tape on the drill bit marks 2½ inches, to make it easier to know when your hole is deep enough. |
We have several maple trees on our property, three of which are big enough around (12" in diameter or more) to tap. Using the drill bit provided in the kit, Romie drilled a hole at a slightly tilted angle (to aid in the sap flow) about two to two-and-a-half inches deep, about three feet off the ground. It's recommended to drill the hole on the south side of the tree, preferably below a large branch or above an obvious root flare. Since we can't see the ground yet because of all the snow, we let a branch be our guide.
 |
| Even at the first bit of drilling, the sap was beginning to run! |
I didn't really know what to expect when we drilled the first hole in one of the trees, but immediately the sap began running out. Being first-timers, Romie and I both were pretty excited to see that.
Romie continued to drill, bringing the bit out every now and then to clear the hole of shavings. Once it was at the proper depth, he inserted the spile through the hook provided for hanging the collecting bucket, and used a hammer to gently tap it into the hole as far as he could.
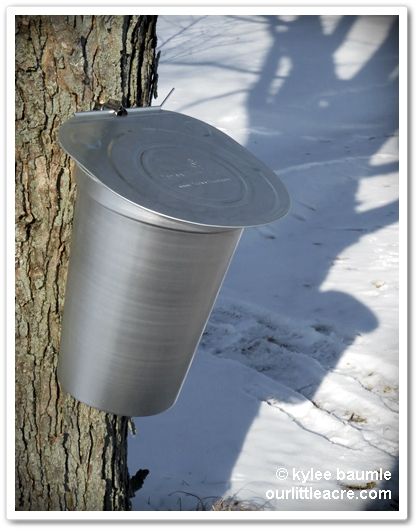
The aluminum bucket provided in the kit has a hole for hanging on the hook and there's a lid that attaches to the spile via a pin, designed to allow for easy removal of the bucket when you need to empty it.
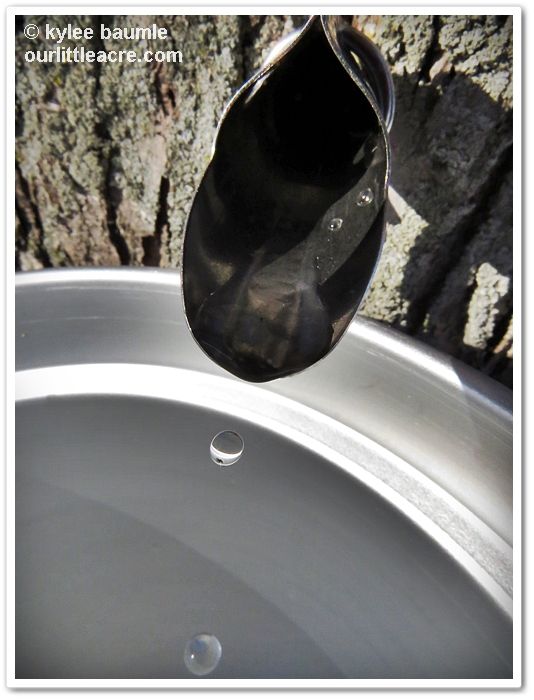 |
| Here comes the sap! |
We tapped two more trees and now we'll check them each day to see how much sap we're getting. We'll empty the buckets as needed, keeping the collected sap in the refrigerator until it's time to stop collecting it. That's when the temperatures are consistently above freezing and/or the sap begins to get cloudy or turn yellow. It'll be several weeks yet before that happens, about the same time that the trees break bud.
 |
| Our first tapped maple tree! |
Wasn't that easy? We thought so. I'll be sure to let you know how the rest of it goes and if we get enough sap to make a little bit of maple syrup. I think the three trees we tapped are silver maples, which doesn't have the highest sugar content of the recommended maples to tap, but it has enough. Sugar maples are highest in sugar content, with black maples, red maples, and silver maples next in line. It takes a lot of sap to make syrup, but I've got confidence that our trees are up to the task.
For more information about tapping maple trees and making syrup from the sap, as well as supplies needed to tap, check out Tap My Trees. I highly recommend the Starter Kit. It's also available in a less expensive version with plastic buckets, but I really like the vintage look and feel of the aluminum ones.
________________________
Thanks to Joe McHale for providing a Starter Kit to me free of charge. All opinions stated here are my own.


 "Bejeweled"


6 comments:
I'd start boiling down the sap to syrup right away...unless you have a REALLY large fridge....
Rachelle ~ We'll see how much sap we get! We do have an extra refrigerator in our garage. ;-)
That is a dandy kit. I will be interested in your process.
So interesting! I love all of the experiments you do in your garden all year, Kylee. You always have the best projects! I can't wait to hear how your syrup turns out!
I found you via my friend, Dana Mees. I love all your gardening information, but it usually makes me sad. Gardening in Wyoming is not quite the same. Congratulations on tapping your first maple - I would love someday to be able to take part in that.
I can't wait to hear how your maple syrup experiment will end up!
Post a Comment